This post does not contain recipes. I have been asked to explain how I organize and streamline meal preparation.
Introduction
Everyone knows that life is busy. Mine always has been--early on it was with two precious girls to care for and grow with. Nowadays it is filled with projects, projects, projects and family, family, family. To "earn the time" to work on my projects, I must also manage meals, health issues, laundry, along with family, friends, e-mail, social media, etc.
I often ponder how today's mothers ever survive. I really could not have handled one more thing when my girls were young. Between caring for them, making almost all of our clothes, canning, freezing, and preserving foods, volunteering at school, taking classes for myself, etc., it was a busy life. But I was blessed--for ten years I did not have to leave home everyday and work for someone else--all my work was unpaid and incredibly rewarding!
I started early trying to make meal prep time more efficient and and less time-consuming. I would make meatloafs and freeze them in big butter boxes (just the right size for a family meatloaf), large quantities of spaghetti sauce, big chili’s, etc. (Please do not ask my family about my experimental ‘cinnamon chili’  !! Well you see, I had read that a little cinnamon was good in tomato sauces and chili, but no one defined "a little").
Even before we started a family, I shocked my dear English husband by insisting that I had to have a medium-sized chest freezer that someone was selling cheaply. His mom had only recently gotten her first refrigerator and he thought I was CRAZY--but I can tell you that never in our lives since then have we been without a freezer, and never is it empty. I go through regularly to make sure things are getting used up in time. Mostly I cook and put stuff in there for an “easy” day in the kitchen on a regular basis!
I made menus, planned shopping lists, etc., but over time I learned that for daily living what works best for me is to “have stuff on hand” (i.e., in jars or in the freezer) when time to fix dinner. Then some meal times do not take up almost any time at all. Other days I cook (and freeze extras, etc).
Philosophy
So what do I do to achieve my goal of having healthy meals while minimizing the time and effort to produce them?
The foundation of my system rests in the following: SHOP IN BUILK and HAVE AN ASSEMBLY LINE FOR EVERYTHING: WASHING, CHOPPING, STORING, and yes, even cooking.
SHOP IN BUILK to make meal preparation more efficient:
MEAT - I often buy at least enough for two meals. When possible, I hope to have a little bit left over to put into the freezer to go into winter soups. If I cook a huge amount, I hope to have several meals worth in easily accessible units so I can get out just the amount I need.
Tips on freezing:
Try to keep the air out of the package as much as possible. (You can spend lots of time and effort on food sealers, etc.--I have one, but basically never use it anymore.)
Please Note: A number of the techniques described for meats and poultry can be successfully applied to Vegetarian foods and dishes. I just make certain that the protein and other ingredients freeze well.
- As a for instance, lasagna noodles freeze well.
- Rice included in cooked dishes freezes well.
- The dish may be thicker when thawed and may require additional broth or sauce.
- I have no idea how well sticky-rice would freeze, but I wouldn't try it.
- When I made TVP-based marinara sauce, I froze it regularly. It worked well.
- I have no current information on how well tofu freezes.
- Many grain-based foods may agglutinate if cooked, frozen, and re-heated.
- I do not recommend freezing this kind--at least I would experiment with each one prior freezing a lot of it.
- Sometimes all that is needed is the addition of more liquid, which is also true for many non-vegetarian foods.
- More tomato sauce or broth is a frequent addition of mine.
I have sometimes had quite poor outcomes when freezing creamy soups/dishes.
Dairy tends to separate, so I rarely freeze cream-based foods.
I almost never make dairy sauces with flour; sauces with flour would be less likely to separate in freezing, but I do not know if I recommend it or not.
- Spaghetti sauces, chili's, and things of similar consistency.
- For cooked sauces (including meats and beans in the case of chili), I have had great success using the same method as I describe for freezing chicken and meats below in what I call "Flat Packs:
- Fill a gallon ziploc FREEZER bag, with enough to be about 5/8" deep when laid FLAT, leaving at least 1-in. space at the top.
- I have to check along the way or it can get over-filled; then you have to remove the excess--messy.
- Carefully lay it flat without squeezing the food out of the bag.
- Expel ALL of the air remaining in the bag.
- If there is any food on the "sealing lip" of the bag, wipe it off with a clean damp paper towel.
- Carefully close the zipper.
- Freeze flat by laying it on a cutting board, piece of cardboard, etc.
- If you bunch it up:
- It takes a LOT longer to thaw
- You cannot remove just the amount you would like to warm.
- Keep it flat until thoroughly frozen.
- A stack of more than one bag takes a little longer to become solidly frozen.
- Check before removing the board to make certain it is solidly frozen.
- When ready to use, decide how much you want to thaw. Break off that amount, expel the air, re-seal, and put back into the freezer while it is still frozen.
- Warm your sauce, chili, or potage.
- I do not use this method with things that are very runny. That could get really messy.
Poultry, cooked -- I buy 2-3 rotisserie chickens at a time. -- Please see "Make it Simpler Alert" below for new shortcut!
- Lay out some paper which comes as packing in boxes on the counter top to make clean-up easy.
- Then while the chicken is still warm I pull all of the meat off the bones.
- I keep enough for a couple of meals in the refrigerator.
- MAKE IT SIMPLE ALERT: Perhaps they were there all the time I do not know; but in April 2014 I found that Costco does this job for you! At the end of the day they pull the breast meat off cooked chickens and vacuum seal it in about 2-1/4 pound packages which are good for about a month!
- I save this until I wish to use it. I remove what I want and THEN I put it into the flat-pak gallon ziploc Freezer bag, as pictured below. Works just the same.
- They charge very little for pulling it off the bone for you!
- I don't know if they have them all the time, but I found them in one of the refrigerated display cases.
- I pull the remainder apart into smaller chunks..
- Take a gallon ziploc FREEZER bag (not the regular kind--you want a good seal and no freezer burn); lay the bag it on it’s side on a tray or plate (anything to keep it flat-ish while freezing).
- Put the meat into the bag until you have a nice “layer”. (Not crammed so close together that you can’t easily break it apart when frozen.).
- When the bag is full, press out as much air as possible, then seal.
- Use a Sharpie marker to label the type (chicken or turkey) and the date.
- Stack as many bags as necessary on top of each other.
- There are two bags in this stack--lots of meals:
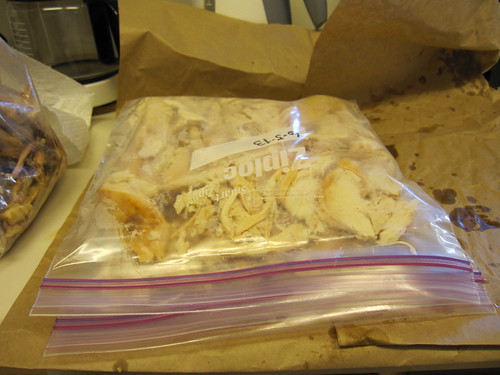
- Put into the freezer on the tray and leave the tray under the meat until it is frozen hard. (I usually leave it for a couple of days.)
- Then remove the tray.
- At this point shake up each bag so that a few pieces can be easily removed at a time.
- For longer-term storage, put that ziploc bag into another one and seal.
- When ready to use remove as much as desired, press the air out, and re-seal the bag(s).
Beef, raw -- I frequently purchase a whole tray of steak, etc.
- Wrap each piece in good heavy plastic food wrap.
- Very important: AS YOU WRAP, press out as much air as possible.
- Repeat the process, so each piece of meat is double-wrapped.(avoiding freezer burn)
- Put the wrapped pieces into a gallon ziploc freezer bag, expelling as much air as possible.
- Use a Sharpie marker to label the type of meat (beef, lamb, etc.) and the date.
- When ready to use, just remove as many as you want to cook, thaw, and cook.
Beef, cooked:
- Ground:
- Brown in a skillet as normal, drain all liquids, and insert into a gallon ziploc freezer bag, making a layer which is maybe ¾-in. thick.
- Use a Sharpie marker to label with type of meat (beef, lamb, etc.) and the date.
- Lay on plate or tray to keep flat while freezing.
- Once frozen, bash it around a bit to break it up so it is easy to remove just what you need.
- Roasts and tenderloin:
- Slice as you would for a meal.
- Lay out a large piece of heavy plastic food wrap.
- Place the slices on the wrap so there is about an inch all the way around each piece.
- Put another piece of wrap on top.
- Press as much air out as possible, making the wrap layers meet all the way around each piece.
- Carefully roll up the wrapped meat (keeping it separated).
- Put in gallon ziploc freezer bag. Seal well.
- Use a Sharpie marker to label with type of meat and date.
- Freeze the bag flat to keep the pieces separated.
- When it’s time to use it, remove only as many pieces as you want, thaw, and warm.
Vegetables:
- I always keep packages of peas, beans, and corn. etc. in the freezer. With some fresh potatoes, thawed cooked meat, and steamed vegies, a meal is ready in less than 30 minutes.
- Onions - fabulous new trick:
- Chop onions, brown, and scoop into one quart ziploc freezer bags. Make it about 1/2-inch thick. Expel excess air and seal.
- THEN: Lay each on a flat surface that you can put into the freezer for a couple of days (like a cutting board).
- Using the side of your hand, make an "+" right across the bag, creating four "pods" of the onions.
- (Flickr won't let me extract my photo; I will put a photo here as soon as I am able to.)
- When they are frozen, remove the cutting board from the freezer.
- You can then easily remove the browned onions in segments.
Sauces:
- I make my own marinara sauce in a concentrated form. It is a huge and time-consuming project. I make it in a 16-quart crock pot, then freeze in pint or quart jars.
- When I take my sauce out of the freezer, I add more tomato sauce and tomato paste and adjust the herbs to taste. With the frozen cooked ground meat, spaghetti, lasagna, etc., can be prepared very quickly--once the sauce is thawed.
- If I’m out of my own sauce, I "doctor" store-bought marinara sauce and use my frozen ground meat…
- Sometimes it comes out just about as good as my own sauce; sometimes it is not quite that successful, but normally it is pretty good.
Au Jus:
I keep every tiny teaspoon of au jus from meat and poultry, including the juice from the plate the meat rested on until served..
- I keep small jam jars in the freezer labelled Chicken, Lamb, Beef.
- I pour in each bit that I collect and put it back in the freezer until there is enough to use.
- Sometimes I reserve the excess "juice" from a salad, or other dish.
- Freeze it if not using immediately. (another good use for tiny jam jars)
- When creating a new dish, you can add all sorts, but a tiny bit of jam/preserves added to a tart sauce can make a nice complement to protein.
Broths:
From time to time I make my own broths which I use in soups, potage, and other dishes. My favorite and most nutritious one is made from 100% grass-feed beef bones. It is absolutely awesome (and just about as expensive to make as it is awesome). I often use it in place of any kind of “fat” when cooking vegetables, etc.
Potage (rich soup):
I make potage in large quantities and freeze in quart jars. That is the time to go through the entire freezer and collect up all those leftovers and au jus to create a tasty potage. Freeze quarts of it for other days.
For ideas on how to make your own, please see: http://lazycooks-recipes.blogspot.com/2013/09/potage-variety-and-variations.html
For ideas on how to make your own, please see: http://lazycooks-recipes.blogspot.com/2013/09/potage-variety-and-variations.html
Heating/Cooking Methods for frozen foods:
- Thaw and grill, bake/roast, or heat as normal
- Thawing Hint: If there is enough time, to speed the process, I put my frozen food in jars in the sunshine on a black surface--it thaws much faster on a hot day.
- DO NOT FORGET that it is outside.
- I do the same for meats, but turn them every 30 minutes and bring them inside before they are completely thawed.
- They will thaw much more quickly than, say, a potage or marinara sauce in a glass jar.
- DO NOT risk your health by using any method over which you will not exercise extreme caution and control.
- Some foods lend themselves better to one method than another.
- If you are in a hurry and do not mind using a microwave, you can speed the process by defrosting in the microwave, then heating or cooking as normal (oven or stovetop).
- If you are in a big hurry, most things can be thawed and heated in the microwave.
- I do not "cook" meat, poultry or fish in the microwave, ever, but some people do.
- I would prefer not to do so, but I do use the microwave to re-warm some foods.
- I have not had good success in cooking frozen meats without thawing them.
- For any dish with cheese on top--vegetarian or non--it works best if you omit the cheese until it is thawed and re-heated.
- It is possible to carefully re-heat lasagna that already has the cheese, but the cheese may be a bit stringy or tough.
- When I make lasagna to freeze:
- I omit the top layer of cheese.
- I place a piece of good plastic food wrap over the dish, mashing it down well and smoothing it out all over to make certain the food is "sealed".
- Then I place a second piece of wrap over the dish in the usual manner.
- When thawed, I remove the wrap and heat with a piece of foil laid very loosely over the top of the baking dish.
- If it looks at all "dry", spread a small can of tomato sauce over the top.
- At some point during the re-heating process, use a spoon to press the additional sauce down into the original sauce to blend it a little bit.
- (You can also microwave-defrost it to get it close to warm enough.)
- When it is getting close to warm enough, I place the cheese on the top and finish baking it.
HAVE AN ASSEMBLY LINE FOR EVERYTHING: WASHING, CHOPPING, STORING, and yes, even cooking.
I have described above my “assembly line” method for dealing with both raw and cooked meats and poultry to be frozen. Now to the vegetables.
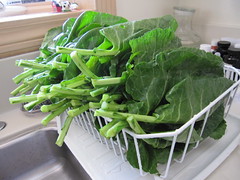
When I purchase a lot of vegetables and/or fruits, I temporarily dedicate my sink, drainer, etc. to cleaning and draining.
First I scrub the sink with dish soap and HOT water.
- If I have any questions about meat contamination, I spray the sink with full-strength vinegar and let it sit for a few minutes.
Then I fill the sink with cold water and add salt (to kill parasites--all those little black dots which come off your greens when you wash them). When washing greens, I am very generous with the salt.
- You are going to wash it off, so it should not add sodium to your diet.
I wash the vegetables in the order that makes sense--things like cucumbers, squash, peppers, etc., first--beets last.
- Rinse well under running water, drain, and dry when appropriate
- for greens--I shake them hard, then drain.

- Draining collards
- When storing ALL foods, it is important to remove as much water as possible.
- Shake and shake and shake leafy things.
- Dry other things with a clean towel.
- I use paper towels around many things to further reduce moisture caused by condensation in the refrigerator.
- Water is not your food's friend, especially while storing!
- Air is also not your food's friend.
I save the large-size spinach boxes and re-use them for cleaned kale, collards, etc.
- I pull out paper towels long enough to go all the way around (4 of the select-a-size towels sections).
- Put the paper towels in the box and load it with greens.

- Wrap the remaining paper towel around the top, and put on the lid.

- You cannot overfill it very much, you can squash it a little, but the lid will not stay down enough to preserve it.
- Remember: air is the enemy of food storage.
- Finished box
- I cut a chunk out of the lid of a box I recycled and wrote on the back of it with Sharpie Marker so I could differentiate between kale, spinach, and other greens. You don't have to do this, but it really helps me.
- I made a few of these and wash and store them in a kitchen drawer for rapid access when prepping vegies.
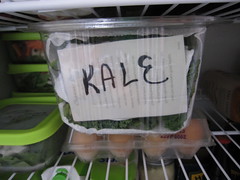
- My family knows that if food is in one of the plastic store-type boxes with paper towels, it has been washed and is ready to eat.
- If it is still in it’s own box with no paper towel, it must be washed before eating.
If I am not going into salad making mode, my cleaned vegies, grapes, etc., are ready to go into the refrigerator.
Salads:
When all the vegetables I am going to use are cleaned and draining, I set up a chopping station. I personally like to use a largish plastic tray that holds a chopping board and is also longer than my NicerDicer.

I also use a small piece of packing paper from shipping boxes (which comes to our house regularly) and make a space for cutting ends off vegies, peeling onions, etc. (I am always making clean-up easier and faster. Paper is on the right of the tray near the garbage can.)
- If I am chopping them before they go into the refrigerator, but not pre-assembling salads, they will end up looking like this (all ready to go out so each person can choose what they like on their own salad):
- Please see NicerDicer notes below on chopping.

Pre-Assembling Salads:
Near-by, I set out my salad containers in a row.

- I have learned that they will keep longer if I use slightly small containers, slightly overfill them, and push the air out with the lid.
First, I put salad greens into each container.
- I save a few leaves for later, as you will see.
Next I use my NicerDicer to “julienne” and cube the vegies. I begin with white (jicama), then cucumber, then go to carrots, peppers, and finally beets, so as not to get vegetable dye on everything. I use the smaller grid for jicama, carrots, and beets--nearest I can get to julenne. Then I use the larger grid for cucumber, peppers, etc.
- There’s a trick to chopping solid things like beets with the NicerDicer.
- A NicerDicer cannot take a very large piece of "solid" vegies (like carrots, jicama, beets, etc.
- Carrots - (I don't peel them, just clean and chop)
- Cut about 1-In. sections, stand them on their end, and chop!
- Beets, jicama, onions, etc.
- Cut them into about 1+ inch chunks, not more than 1-in. tall
- Place them on the NicerDicer, and chop!
- You can go quite fast, so it's a smooth process.
- This carrot is almost too big to julienne easily with the NicerDicer. Beets are also dense. Experiment to find the right size for you.

 Julienned!
- Then lay 3-4 slices on the large grid of the NicerDicer and chop!
- For finely chopped onions, I slice them about 3/8" thick and use the small grid.
- As I chop each type of vegetable, I unscrew the container it chops into, take that over to the salad assembly area, and put that vegie into each salad--plop, plop, plop.

- Repeat for each kind of vegie.

- Add whatever else I want (dried fruit, etc.)
Then I put about 6 leaves on the top.

- I do NOT put in tomatoes, nuts, or seeds in at this stage.
- Tomatoes will get runny and nuts and seeds will get soggy.
- Also, I do not use my NicerDicer to chop tomatoes or nuts--too big a mess and ineffective.
- Nuts just completely "gunk up" in the grid.
- I add those things when I am ready to eat my salad.
- When the salads are fully assembled, I squeeze a little bit of lemon juice over each.
- Then I press each salad down firmly and put the lid on (burping the lid to expel as much air as possible).
- Later, if I am leaving the house with the salad, I remove the top leaves, add the remaining items and dressing, replace the leaves, and the lid.
- The leaves help contain the dressing so the lid is not all messy when opened.
- Salads ready for the refrigerator
- With this storage method I have kept salads for a week. I prefer about 5 days, but another day or so is usually ok.
The over-filled boxes are a bit trickier to eat out of until you’ve had a few bites--you might drop a leaf or two. But when you have pressed them down, they will naturally compress a little over time so you can fit in your tomatoes, etc.
When ready to eat a salad at home, add tomatoes, fresh fruit, nuts, seeds, as desired.
- I often tip my salad out into a larger dish for ease of eating. It plays havoc with my “nicely built” colorful salad, but it’s easier to eat. (Target calls the bowl on the right a 'pasta dish'.)

- And for variety, I add all sorts at dinner time. In this case it is rice and beans; sometimes it is a hamburger and onion; last night it was tenderloin slices from the freezer; tonight it was ground beef in tomato sauce with vegies cooked with lots of fresh chopped spinach..
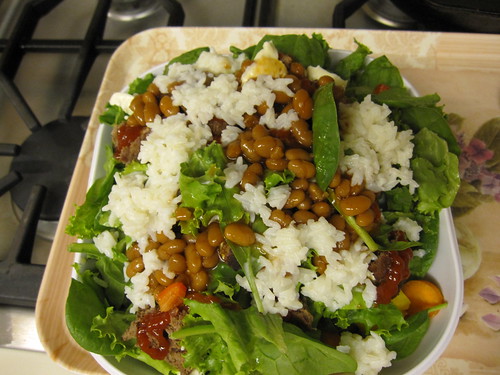
- I have been pleasantly surprised that almost ANYTHING is tasty on top of my salad, including chili, cooked meats and vegetables, etc. I have put things on top that I would never have dreamed of and have yet to be anything other than pleasantly surprised.
Varieties for crock-pot meals are endless. To create great variety and quick, easy prep time, here is an idea from others. (I am actually at home most of the time, so haven't tried this idea.)
- The idea is to chop different combinations of vegetables that you want to use together and put them into bags in the same way I described prepping cooked ground beef or chicken (above).
- Add meats, broth, sauces, etc.
- You can always add the broths the morning you cook the meal, but if you want absolute minimum morning prep-time, put them in with everything else.
- Lay the Freezer ziploc bags flat, expel excess air, and freeze.
- You may now have liquids in your bag, so use caution when laying it flat to expel the air and make certain it is completely sealed!
- Pull out one bag per day, drop into the crockpot with liquid and meat, and you have a meal!
- If one bag is not big enough, put the meats, broths, and sauces into a separate bag.
- Then add both bags to the crockpot and come home to a delicious hot meal!
- Chop all your vegies assembly-line style as described above in preparing salad vegies. Determine the size of the chopped vegetable by how long it takes to cook.
- More quickly cooked items can be chopped larger; items which take longer should be chopped smaller.)
- Add meats, sauces, broths, and even sometimes fruit
- Expell excess air, seal, and freeze flat (for quicker thawing)
.Here is an idea of vegetables you may wish to chop and put into the bags:
SHOPPING HINTS!!!
Re-usable bags can be sort of a nuisance in getting them in and out of the store.
My daughter has recently been THANKED by baggers because her bags were clean!
- Grab items like peas, niblets corn, etc. from the freezer and add them to the bags so your morning prep-time each day is the absolute minimum.
- Carrots (chop small)
- Onions
- Beets (chop small)
- Peppers
- Drained canned beans may also be added.
- Cooked rice
- For some specific recipes, I found this blog to contain some useful ideasl:
[I really do prefer everything prepped and/or cooked at the time I eat--it is more nutritious that way, but I have learned that if I want to eat better I must have meals more available on many days, so it is a trade-off. I prep-ahead when possible.]
SHOPPING HINTS!!!
Re-usable bags can be sort of a nuisance in getting them in and out of the store.
- I store mine on key rings with a carabiner--handy for grabbing.
- This photo shows two carabiners clipped to my purse for keeping track of them in the store.

- Of course you can also just stick all of the bags into one bag without folding, stuffing, etc. Then grab that bag to take in with you.
- Landfills will groan and say "thank you" if you use re-usable bags. (It is now illegal to do otherwise where we live, which is awesome!)
- They told her people bring them bags which are filthy with vegetable and even meat residue which is molded. Apart from being disgusting, this is downright unhealthy and there is no excuse for it.
- First of all, don't buy those 99-cent sort of fuzzy bags--they accumulate more bacteria and dirt in the fuzz and do not wash well, if at all.
- Buy the "nylon" type reusable bags which can go into the washer a zillion times with no problem.
- The big favorite in our family is ChicoBags®.
- They make quite a number of styles to suit your preference.
- The reason we use them most is because they also set up their website for very easy fund-raising, so my daughter has raised money for at least three schools by simply selling them to the parents to help them reduce or eliminate their plastic bag use.
- Whole Foods sells them with their own label, but we like the fund-raising.
- I also have quite a number of other similar ones from various places.
- When I unpack any bag with meat, fish, or poultry, that bag goes immediately into the laundry hamper.
- If a bag has had nothing wet or dirty in it, I do not wash it every time; I might use it 3-4 times before putting it into the laundry.
- A few times a year I put every single bag into the laundry, just to make sure they are all cleaned.
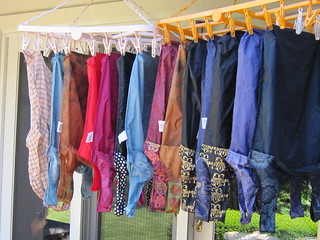
On laundry day, I happen to have some nice racks which let them dry flat, but they dry so quickly you can just hang them up any old way if that's your preference.
========================================================================
Here's hoping some of these ideas will help speed you towards a goal of organized, efficient, and less time-consuming healthy eating!
Here's hoping some of these ideas will help speed you towards a goal of organized, efficient, and less time-consuming healthy eating!